How to Zoom in on Google Draw
The maps in the Maps SDK for Android can be tilted and rotated with easy gestures, giving users the ability to adjust the map with an orientation that makes sense for them. At any zoom level, you can pan the map, or change its perspective with very little latency thanks to the smaller footprint of the vector-based map tiles.
Code samples
The ApiDemos repository on GitHub includes a sample that demonstrates the camera features:
- CameraDemoActivity - Java: Changing the camera position
- CameraDemoActivity - Kotlin: Changing the camera position
Introduction
Like Google Maps on the web, the Maps SDK for Android represents the world's surface (a sphere) on your device's screen (a flat plane) using the Mercator projection. In the east and west direction, the map is repeated infinitely as the world seamlessly wraps around on itself. In the north and south direction the map is limited to approximately 85 degrees north and 85 degrees south.
Note: A Mercator projection has a finite width longitudinally but an infinite height latitudinally. We "cut off" base map imagery utilizing the Mercator projection at approximately +/- 85 degrees to make the resulting map shape square, which allows easier logic for tile selection.
The Maps SDK for Android allows you to change the user's viewpoint of the map by modifying the map's camera.
Changes to the camera will not make any changes to markers, overlays, or other graphics you've added, although you may want to change your additions to fit better with the new view.
Because you can listen for user gestures on the map, you can change the map in response to user requests. For example, the callback method OnMapClickListener.onMapClick() responds to a single tap on the map. Because the method receives the latitude and longitude of the tap location, you can respond by panning or zooming to that point. Similar methods are available for responding to taps on a marker's bubble or for responding to a drag gesture on a marker.
You can also listen for camera movements, so that your app receives a notification when the camera starts moving, is currently moving, or stops moving. For details, see the guide to camera change events.
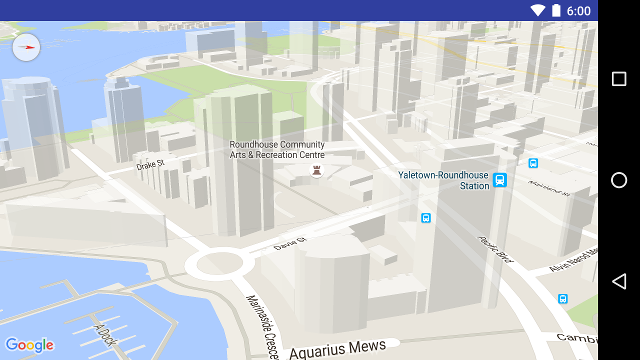
3D buildings on the map
Many cities, when viewed close up, will have 3D buildings visible, as viewable in the below picture of Vancouver, Canada. You can disable the 3d buildings by calling GoogleMap.setBuildingsEnabled(false).
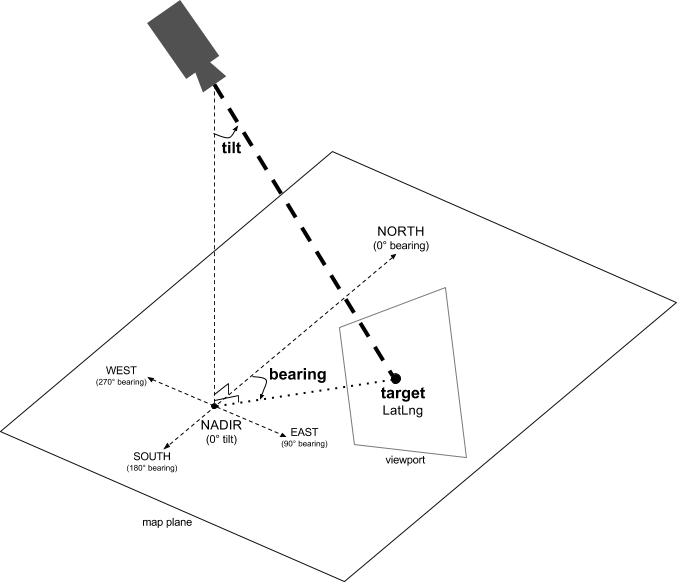
The camera position
The map view is modeled as a camera looking down on a flat plane. The position of the camera (and hence the rendering of the map) is specified by the following properties: target (latitude/longitude location), bearing, tilt, and zoom.
Target (location)
The camera target is the location of the center of the map, specified as latitude and longitude co-ordinates.
Bearing (orientation)
The camera bearing is the direction in which a vertical line on the map points, measured in degrees clockwise from north. Someone driving a car often turns a road map to align it with their direction of travel, while hikers using a map and compass usually orient the map so that a vertical line is pointing north. The Maps API lets you change a map's alignment or bearing. For example, a bearing of 90 degrees results in a map where the upwards direction points due east.
Tilt (viewing angle)
The tilt defines the camera's position on an arc between directly over the map's center position and the surface of the Earth, measured in degrees from the nadir (the direction pointing directly below the camera). When you change the viewing angle, the map appears in perspective, with far-away features appearing smaller, and nearby features appearing larger. The following illustrations demonstrate this.
In the images below, the viewing angle is 0 degrees. The first image shows a schematic of this; position 1 is the camera position, and position 2 is the current map position. The resulting map is shown below it.
In the images below, the viewing angle is 45 degrees. Notice that the camera isn't tilted at 45 degrees; instead, it moves halfway along an arc between straight overhead (0 degrees) and the ground (90 degrees), to position 3. The camera is still pointing at the map's center point, but now the area represented by the line at position 4 is now visible.
The map in this screenshot is still centered on the same point as in the original map, but more features have appeared at the top of the map. As you increase the angle beyond 45 degrees, features between the camera and the map position appear proportionally larger, while features beyond the map position appear proportionally smaller, yielding a three-dimensional effect.
Zoom
The zoom level of the camera determines the scale of the map. At larger zoom levels more detail can be seen on the screen, while at smaller zoom levels more of the world can be seen on the screen. At zoom level 0, the scale of the map is such that the entire world has a width of approximately 256dp (density-independent pixels).
Increasing the zoom level by 1 doubles the width of the world on the screen. Hence at zoom level N, the width of the world is approximately 256 * 2N dp, i.e., at zoom level 2, the whole world is approximately 1024dp wide. Note that the zoom level need not be an integer. The range of zoom levels permitted by the map depends on a number of factors including location, map type and screen size. Any number out of the range will be converted to the next closest valid value, which can be either the minimum zoom level or the maximum zoom level. The following list shows the approximate level of detail you can expect to see at each zoom level:
- 1: World
- 5: Landmass/continent
- 10: City
- 15: Streets
- 20: Buildings
The following images show the visual appearance of different zoom levels:
Note: Due to screen size and density, some devices may not support the lowest zoom levels. Use GoogleMap.getMinimumZoomLevel() to get the minimum zoom level possible for the map. If you need to show the entire world in the viewport, it may be better to use Lite Mode.
Moving the camera
The Maps API allows you to change which part of the world is visible on the map. This is achieved by changing the position of the camera (as opposed to moving the map).
When you change the camera, you have the option of animating the resulting camera movement. The animation interpolates between the current camera attributes and the new camera attributes. You can also control the duration of the animation.
To change the position of the camera, you must specify where you want to move the camera, using a CameraUpdate. The Maps API allows you to create many different types of CameraUpdate using CameraUpdateFactory. The following options are available:
Changing zoom level and setting minimum/maximum zoom
CameraUpdateFactory.zoomIn() and CameraUpdateFactory.zoomOut() give you a CameraUpdate that changes the zoom level by 1.0, while keeping all other properties the same.
CameraUpdateFactory.zoomTo(float) gives you a CameraUpdate that changes the zoom level to the given value, while keeping all other properties the same.
CameraUpdateFactory.zoomBy(float) and CameraUpdateFactory.zoomBy(float, Point) give you a CameraUpdate that increases (or decreases, if the value is negative) the zoom level by the given value. The latter fixes the given point on the screen such that it remains at the same location (latitude/longitude) and so it may change the location of the camera in order to achieve this.
You may find it useful to set a preferred minimum and/or maximum zoom level. For example, this is useful to control the user's experience if your app shows a defined area around a point of interest, or if you're using a custom tile overlay with a limited set of zoom levels.
Java
private GoogleMap map; map.setMinZoomPreference(6.0f); map.setMaxZoomPreference(14.0f);
Kotlin
private lateinit var map: GoogleMap map.setMinZoomPreference(6.0f) map.setMaxZoomPreference(14.0f)
Note that there are technical considerations that may prevent the API from allowing users to zoom too low or too high. For example, satellite or terrain may have a lower maximum zoom than the base map tiles.
Changing camera position
There are two convenience methods for the common position changes. CameraUpdateFactory.newLatLng(LatLng) gives you a CameraUpdate that changes the camera's latitude and longitude, while preserving all other properties. CameraUpdateFactory.newLatLngZoom(LatLng, float) gives you a CameraUpdate that changes the camera's latitude, longitude and zoom, while preserving all other properties.
For full flexibility in changing the camera position, use CameraUpdateFactory.newCameraPosition(CameraPosition) which gives you a CameraUpdate that moves the camera to the given position. A CameraPosition can be obtained either directly, using new CameraPosition() or with a CameraPosition.Builder using new CameraPosition.Builder().
Panning (scrolling)
CameraUpdateFactory.scrollBy(float, float) gives you a CameraUpdate that changes the camera's latitude and longitude such that the map moves by the specified number of pixels. A positive x value causes the camera to move to the right, so that the map appears to have moved to the left. A positive y value causes the camera to move down, so that the map appears to have moved up. Conversely, negative x values cause the camera to move to the left, so that the map appears to have moved right and negative y values cause the camera to move up. The scrolling is relative to the camera's current orientation. For example, if the camera has a bearing of 90 degrees, then east is "up".
Setting boundaries
Setting the bounds of the map
It's sometimes useful to move the camera such that an entire area of interest is visible at the greatest possible zoom level. For example, if you're displaying all of the gas stations within five miles of the user's current position, you may want to move the camera such that they are all visible on the screen. To do this, first calculate the LatLngBounds that you want to be visible on the screen. You can then use CameraUpdateFactory.newLatLngBounds(LatLngBounds bounds, int padding) to obtain a CameraUpdate that changes the camera position such that the given LatLngBounds fits entirely within the map, taking into account the padding (in pixels) specified. The returned CameraUpdate ensures that the gap (in pixels) between the given bounds and the edge of the map will be at least as much as the specified padding. Note that the tilt and bearing of the map will both be 0.
Java
LatLngBounds australiaBounds = new LatLngBounds( new LatLng(-44, 113), // SW bounds new LatLng(-10, 154) // NE bounds ); map.moveCamera(CameraUpdateFactory.newLatLngBounds(australiaBounds, 0));
Kotlin
val australiaBounds = LatLngBounds( LatLng((-44.0), 113.0), // SW bounds LatLng((-10.0), 154.0) // NE bounds ) map.moveCamera(CameraUpdateFactory.newLatLngBounds(australiaBounds, 0))
Centering the map within an area
In some cases, you may wish to center your camera within a bounds instead of including the extreme borders. For example, to center the camera on a country while maintaining a constant zoom. In this case, you can use a similar method, by creating a LatLngBounds and using CameraUpdateFactory.newLatLngZoom(LatLng latLng, float zoom) with the LatLngBounds.getCenter() method. The getCenter() method will return the geographic center of the LatLngBounds.
Java
LatLngBounds australiaBounds = new LatLngBounds( new LatLng(-44, 113), // SW bounds new LatLng(-10, 154) // NE bounds ); map.moveCamera(CameraUpdateFactory.newLatLngZoom(australiaBounds.getCenter(), 10));
Kotlin
val australiaBounds = LatLngBounds( LatLng((-44.0), 113.0), // SW bounds LatLng((-10.0), 154.0) // NE bounds ) map.moveCamera(CameraUpdateFactory.newLatLngZoom(australiaBounds.center, 10f))
An overload of the method, newLatLngBounds(boundary, width, height, padding) allows you to specify a width and height in pixels for a rectangle, with the intention that these correspond to the dimensions of the map. The rectangle is positioned such that its center is the same as that of the map's view (so that if the dimensions specified are the same as those of the map's view, then the rectangle coincides with the map's view). The returned CameraUpdate will move the camera such that the specified LatLngBounds are centered on screen within the given rectangle at the greatest possible zoom level, taking into account the padding required.
Note: Only use the simpler method newLatLngBounds(boundary, padding) to generate a CameraUpdate if it is going to be used to move the camera after the map has undergone layout. During layout, the API calculates the display boundaries of the map which are needed to correctly project the bounding box. In comparison, you can use the CameraUpdate returned by the more complex method newLatLngBounds(boundary, width, height, padding) at any time, even before the map has undergone layout, because the API calculates the display boundaries from the arguments that you pass.
Restricting the user's panning to a given area
In the above scenarios, you set the bounds of the map but the user can then scroll or pan outside of these bounds. Instead, you may want to constrain the lat/lng centre bounds of the focal point of the map (the camera target) so that users can only scroll and pan within these bounds. For example, a retail app for a shopping centre or airport may want to constrain the map to a particular bounds, allowing users to scroll and pan within those bounds.
Java
// Create a LatLngBounds that includes the city of Adelaide in Australia. LatLngBounds adelaideBounds = new LatLngBounds( new LatLng(-35.0, 138.58), // SW bounds new LatLng(-34.9, 138.61) // NE bounds ); // Constrain the camera target to the Adelaide bounds. map.setLatLngBoundsForCameraTarget(adelaideBounds);
Kotlin
// Create a LatLngBounds that includes the city of Adelaide in Australia. val adelaideBounds = LatLngBounds( LatLng(-35.0, 138.58), // SW bounds LatLng(-34.9, 138.61) // NE bounds ) // Constrain the camera target to the Adelaide bounds. map.setLatLngBoundsForCameraTarget(adelaideBounds)
The following diagram illustrates a scenario when the camera target is constrained to an area that is slightly larger than the viewport. The user can scroll and pan, provided the camera target remains within the bounded area. The cross represents the camera target:

The map always fills the viewport, even if that results in the viewport showing areas that are outside the defined bounds. For example, if you position the camera target at a corner of the bounded area, the area beyond the corner is visible in the viewport but users cannot scroll further into that area. The following diagram illustrates this scenario. The cross represents the camera target:

In the following diagram, the camera target has a very restricted bounds, offering the user very little opportunity to scroll or pan the map. The cross represents the camera target:

Updating the camera view
To apply a CameraUpdate to the map, you can either move the camera instantly or animate the camera smoothly. To move the camera instantly with the given CameraUpdate, you can call GoogleMap.moveCamera(CameraUpdate).
You can make the user experience more pleasing, especially for short moves, by animating the change. To do this instead of calling GoogleMap.moveCamera call GoogleMap.animateCamera. The map will move smoothly to the new attributes. The most detailed form of this method, GoogleMap.animateCamera(cameraUpdate, duration, callback), offers three arguments:
-
cameraUpdate - The
CameraUpdatedescribing where to move the camera. -
callback - An object that implements
GoogleMap.CancellableCallback. This generalized interface for handling tasks defines two methods `onCancel()` and `onFinished()`. For animation, the methods are called in the following circumstances:-
onFinish() - Invoked if the animation goes to completion without interruption.
-
onCancel() -
Invoked if the animation is interrupted by calling
stopAnimation()or starting a new camera movement.Alternatively, this can also occur if you call
GoogleMap.stopAnimation().
-
-
duration - Desired duration of the animation, in milliseconds, as an
int.
The following code snippets illustrate some of the common ways to move the camera.
Java
LatLng sydney = new LatLng(-33.88,151.21); LatLng mountainView = new LatLng(37.4, -122.1); // Move the camera instantly to Sydney with a zoom of 15. map.moveCamera(CameraUpdateFactory.newLatLngZoom(sydney, 15)); // Zoom in, animating the camera. map.animateCamera(CameraUpdateFactory.zoomIn()); // Zoom out to zoom level 10, animating with a duration of 2 seconds. map.animateCamera(CameraUpdateFactory.zoomTo(10), 2000, null); // Construct a CameraPosition focusing on Mountain View and animate the camera to that position. CameraPosition cameraPosition = new CameraPosition.Builder() .target(mountainView ) // Sets the center of the map to Mountain View .zoom(17) // Sets the zoom .bearing(90) // Sets the orientation of the camera to east .tilt(30) // Sets the tilt of the camera to 30 degrees .build(); // Creates a CameraPosition from the builder map.animateCamera(CameraUpdateFactory.newCameraPosition(cameraPosition));
Kotlin
val sydney = LatLng(-33.88, 151.21) val mountainView = LatLng(37.4, -122.1) // Move the camera instantly to Sydney with a zoom of 15. map.moveCamera(CameraUpdateFactory.newLatLngZoom(sydney, 15f)) // Zoom in, animating the camera. map.animateCamera(CameraUpdateFactory.zoomIn()) // Zoom out to zoom level 10, animating with a duration of 2 seconds. map.animateCamera(CameraUpdateFactory.zoomTo(10f), 2000, null) // Construct a CameraPosition focusing on Mountain View and animate the camera to that position. val cameraPosition = CameraPosition.Builder() .target(mountainView) // Sets the center of the map to Mountain View .zoom(17f) // Sets the zoom .bearing(90f) // Sets the orientation of the camera to east .tilt(30f) // Sets the tilt of the camera to 30 degrees .build() // Creates a CameraPosition from the builder map.animateCamera(CameraUpdateFactory.newCameraPosition(cameraPosition))
Source: https://developers.google.com/maps/documentation/android-sdk/views