Easy Items to Build for Beginner Javascript User
Introduction
One of the most popular scripting languages, JavaScript is used in all the web applications for validation, rendering dynamic content, interactive graphics and maps, and much more. Along with HTML and CSS, JS has the power to build complete, robust web applications. Because of JS, the user can interact with a web page and see all the interesting elements on the page. As we explore the projects, we will come to know-how js helps in building interactive web pages. Before that, let us quickly go through the important features of JS:
- Used on both client-side and server-side to create interactive web content.
- Greatly improves user experience by providing dynamic functionality.
- Light-weight language having object-oriented capabilities.
- Interpreted, open and cross-platform language.
- Seamless integration with Java and HTML.
Why JavaScript Projects?
JS is the heart of any web application. Good knowledge of JavaScript can get you a range of challenging and interesting career options like developing mobile and desktop apps, building dynamic websites from scratch, UI/UX designer, or even a full stack developer. If you know the basics of JavaScript, projects are your next step to add stars to your resume. If you don't have any prior programming experience, you can take up basic JavaScript courses and then come back to these projects. If you follow a bit of HTML & CSS, you will understand most of the Javascript projects with the source code mentioned below.
Best JavaScript Projects for Beginners
There is a lot you can do with JavaScript, but we don't want to overwhelm you with everything yet. We have listed the top JavaScript projects that can add value to your resume as well as a career:
1. JavaScript Calculator

We will use simple HTML, CSS, and make all the components work using basic JavaScript functions. To display buttons and numbers, we will use HTML, and add some beautification to them using CSS. To make the buttons perform the respective functions we will use JavaScript. The main function is eval(), which is a global JS function that solves JS codes. The display() function will display the selected number on the calculator screen. Note that the program will work only for mouse events. Here is the complete code:
<html>
<body>
<div class = title >My Beautiful JS Calculator</div>
<table border="2">
<tr>
<td><input type="button" value="c" onclick="clr()"/> </td>
<td colspan="3"><input type="text" id="textval"/></td>
</tr>
<tr>
<td><input type="button" value="+" onclick="display('+')"/> </td>
<td><input type="button" value="1" onclick="display('1')"/> </td>
<td><input type="button" value="2" onclick="display('2')"/> </td>
<td><input type="button" value="3" onclick="display('3')"/> </td>
</tr>
<tr>
<td><input type="button" value="-" onclick="display('-')"/> </td>
<td><input type="button" value="4" onclick="display('4')"/> </td>
<td><input type="button" value="5" onclick="display('5')"/> </td>
<td><input type="button" value="6" onclick="display('6')"/> </td>
</tr>
<tr>
<td><input type="button" value="*" onclick="display('*')"/> </td>
<td><input type="button" value="7" onclick="display('7')"/> </td>
<td><input type="button" value="8" onclick="display('8')"/> </td>
<td><input type="button" value="9" onclick="display('9')"/> </td>
</tr>
<tr>
<td><input type="button" value="/" onclick="display('/')"/> </td>
<td><input type="button" value="." onclick="display('.')"/> </td>
<td><input type="button" value="0" onclick="display('0')"/> </td>
<td><input type="button" value="=" onclick="evaluate()"/> </td>
</tr>
</table>
</body>
<script>
function display(val)
{
          document.getElementById("textval").value+=val
          }
function evaluate()
{
          let x = document.getElementById("textval").value
          let y = eval(x)
          document.getElementById("textval").value = y
}
function clr()
{
          document.getElementById("textval").value = ""
}
</script>
<style>
input[type="button"]
{
border-radius: 10px;
background-color:blue;
color: white;
border-color:#black ;
width:100%;
}
input[type="text"]
{
border-radius: 10px;
text-align: right;
background-color:black;
color: white;
border-color: white;
width:100%
}
</style>
</html>
2. Hangman Game

Hangman is one of our favorite games, and children and adults love it alike. You will be amazed to know that hangman can be developed in a jiffy using JavaScript, HTML, and CSS. Note that the main functionality is defined using JS. HTML is for display, and CSS does the job of beautifying the contents. Although there are many methods defined in the JS of this code snippet, it may seem a bit complicated, but you will realize it is simple once you go through the code. You can also run the code and see the execution line by line.
Check the code and execution here.
3. Tic Tac Toe Game

As children, we used to play this game on paper endlessly. But did you know that it is quite straightforward to develop this game on the computer as well? Thanks to JavaScript. This detailed code at dev. explains how to build a 3x3 tic-tac-toe step by step, which you can later expand to NxN for your own practice and knowledge. The HTML and CSS for the project are pretty simple and neat. The author first starts with pseudocode and then goes on to explain each function one by one.
4. JavaScript Weather App
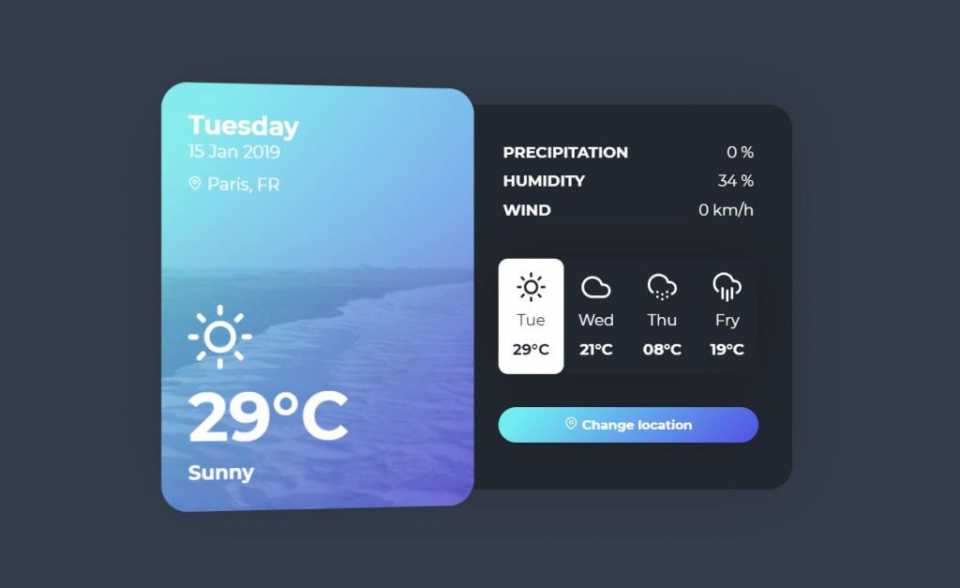
This is a useful and easy to build app to display the weather of various locations. Once the location name is changed, the weather display changes immediately without any page refresh. The UI is neat. Note that most weather apps use an API that gets the weather. We will use the popular and most common API, OpenWeatherMap. Check out this Youtube video that explains the weather app code and functionality in detail. There are three files, as usual: index.html, main.js, and main.css. Although you can put all the code in a single file (HTML), it is neater to have separate files and also easy to maintain.
5. JavaScript Music Events

Here, we introduce you to event listeners that will act on keyboard events. For example, if the 'S' key is pressed, what is the event that will happen? Each event will have a different code and action. Apart from event listeners, we will also learn how to add and play audio files. Note that we have added very basic CSS, as the focus here is on JavaScript. You will have to import your own sounds and background image for the program to work fully.
<html>
<head>
          <meta charset="UTF-8">
          <meta name="viewport" content="width=device-width, initial-scale=1">
          <title>KeyBoard Music</title>
</head>
<body>
          <div class="keys">
          <div data-key="65" class="key">
          <kbd>A</kbd>
          </div>
          <div data-key="83" class="key">
          <kbd>S</kbd>
          </div>
          <div data-key="68" class="key">
          <kbd>D</kbd>
          </div>
          <div data-key="70" class="key">
          <kbd>F</kbd>
          </div>
          <div data-key="71" class="key">
          <kbd>G</kbd>
          </div>
          <div data-key="72" class="key">
          <kbd>H</kbd>
          </div>
          <div data-key="74" class="key">
          <kbd>J</kbd>
          </div>
          <div data-key="75" class="key">
          <kbd>K</kbd>
          </div>
          <div data-key="76" class="key">
          <kbd>L</kbd>
          </div>
          </div>
          <audio data-key="65" src="sounds/clap.wav"></audio>
          <audio data-key="83" src="sounds/chord.wav"></audio>
          <audio data-key="68" src="sounds/ride.wav"></audio>
          <audio data-key="70" src="sounds/openhat.wav"></audio>
          <audio data-key="71" src="sounds/tink.wav"></audio>
          <audio data-key="72" src="sounds/kick.wav"></audio>
          <audio data-key="74" src="sounds/swipe.wav"></audio>
          <audio data-key="75" src="sounds/tom.wav"></audio>
          <audio data-key="76" src="sounds/boom.wav"></audio>
</body>
<script>
function removeTransition(event) {
          if (event.propertyName !== 'transform') return
          event.target.classList.remove('playing')
}
function playSound(event) {
          const audio = document.querySelector(`audio[data-key="${event.keyCode}"]`)
          const key = document.querySelector(`div[data-key="${event.keyCode}"]`)
          if (!audio) return
          key.classList.add('playing')
          audio.currentTime = 0
          audio.play()
}
const keys = Array.from(document.querySelectorAll('.key'))
keys.forEach((key) => key.addEventListener('transitionend', removeTransition))
window.addEventListener('keydown', playSound)
</script>
<style>
html {
          font-size: 12px;
          background: url('drums.jpg') top center;
          background-size: 80%;
}
.keys {
          display: flex;
          flex: 1;
          align-items: top;
          justify-content: center;
}
.key {
          border: 0.4rem solid blue;
          border-radius: 0.5rem;
          margin: 1rem;
          font-size: 2rem;
          padding: 1rem 0.5rem;
          transition: all 0.01s ease;
          width: 5rem;
          text-align: center;
          color: black;
          text-shadow: 0 0 0.5rem yellow;
}
</style>
</html>
6. JavaScript Form Validation
Form validation is a very useful aspect and used by many websites for client-side validation of user details, card details, address details, etc. For example, if there is a mandatory input field name, the user may type a number or leave the field blank, type just one letter, etc. All these validations can be easily done using JavaScript. Let us see a simple form validation project. As usual, the project will need HTML elements as well. We have not done any extensive styling, just included basic elements in the HTML itself. Here is the complete code of a simple form with basic validations:
<html>
          <head>
          <title>Form Validation</title>
          <script type = "text/javascript">
          function validate() {
          var text;
          if( document.myForm.name.value == "" ) {
          text = "Name cannot be empty";
          document.getElementById("demo").innerHTML = text;
          document.myForm.name.focus() ;
          return false;
          }
          if( document.myForm.email.value == "" ) {
          text = "E-mail cannot be empty";
          document.getElementById("demo").innerHTML = text;
          document.myForm.email.focus() ;
          return false;
          }
          var emailID = document.myForm.email.value;
          atposn = emailID.indexOf("@");
          dotposn = emailID.lastIndexOf(".");
          if (atposn < 1 || ( dotposn - atposn < 2 )) {
          text = "Please enter valid email ID";
          document.getElementById("demo").innerHTML = text;
          document.myForm.email.focus() ;
          return false;
          }
          if( document.myForm.phone.value == "" || isNaN( document.myForm.phone.value ) ||
          document.myForm.phone.value.length != 10 ) {
          text = "Please enter a valid 10-digit phone number";
          document.getElementById("demo").innerHTML = text;
          document.myForm.phone.focus() ;
          return false;
          }
          if( document.myForm.subject.value == "0" ) {
          text = "Please provide your area of expertise";
          document.getElementById("demo").innerHTML = text;
          return false;
          }
          return( true );
          }
          </script>
          </head>
          <body>
          <form action = "" name = "myForm" onsubmit = "return(validate());">
        <h1 align="center">USER REGISTRATION</H1>
          <table align="center" cellspacing = "3" cellpadding = "3" border = "3">
          <tr>
          <td align = "right">Name</td>
          <td><input type = "text" name = "name" /></td>
          </tr>
          <tr>
          <td align = "right">E-mail</td>
          <td><input type = "text" name = "email" /></td>
          </tr>
          <tr>
          <td align = "right">Phone Number</td>
          <td><input type = "text" name = "phone" /></td>
          </tr>
          <tr>
          <td align = "right">Subject</td>
          <td>
          <select name = "subject">
          <option value = "0" selected>Select</option>
          <option value = "1">HTML</option>
          <option value = "2">JavaScript</option>
          <option value = "3">CSS</option>
          <option value = "4">JSP</option>
          </select>
          </td>
          </tr>
          </table>
          <p id="demo" style="color:red; text-align:center"></p>
          <div style="text-align:center"><input type = "submit" value = "Submit" /></div>
          </form>
          </body>
</html>
7. JavaScript Photo Details Display

We will display some images on a webpage and once the user hovers over the images, more details will be displayed. You can download the images from anywhere or use the ones you already have. Again, we have used basic HTML and CSS along with JS. The main magic is done in JS. You will learn how mouse hover (over and out) events work through this project.
<!DOCTYPE html>
<html>
          <head>
          <title>My Sun Sign Infos</title>
          </head>
          <script>
          function display(element){
          document.getElementById('image').innerHTML = element.alt;
          }
          function revert(){
          document.getElementById('image').innerHTML = "Hover over a sunsign image to display details.";
          }
          </script>
          <style>
          #image{
          width: 650px;
          height: 70px;
          border:5px solid pink;
          background-color: black;
          background-repeat: no-repeat;
          color:white;
          background-size: 100%;
          font-family: Didot;
          font-size: 150%;
          line-height: 60px;
          text-align: center;
          }
          img{
          width: 200px;
          height: 200px;
          border-radius: 50%;
          }
          </style>
          <body>
          <div>
          <p id = "image">Hover over a sunsign image to display details.<p>
          <img alt = "Sagittarius are beautiful, loyal and passionate." src = "saggi.jpg" onmouseover = "display(this)" onmouseout = "revert()">
          <img alt = "Pisces are dreamy, helpful and love everyone!" src = "pisces.jpg" onmouseover = "display(this)" onmouseout = "revert()">
          <img alt = "Leo are strong and fearless. They aim for and achieve a lot!" src = "leo.jpg" onmouseover = "display(this)" onmouseout = "revert()">
          <img alt = "Scorpions are friends for life. They are trustworthy and truthful." src = "scorpio.jpg" onmouseover = "display(this)" onmouseout = "revert()">
          </div>
          </body>
</html>
To make this project more complex, try this slideshow project from W3Schools. You can change the onClick events to onmousehover and onmouseout events, in which case, the images will change simply once the user hovers over the images.
8. Build an Interactive Landing Page

This is a very cool project to build a dynamic landing page that stores your name and some text written by you in the local storage and shows you an appropriate image and greeting message based on the day's time. This YouTube video will help you in learning about all the JS components used for this project.
9. Build a Shopping Cart for Order Fulfillment

Okay, we have been doing all small projects and with pure JS, HTML, and CSS. The author builds a full-fledged shopping cart for order fulfillment. The project also uses jQuery, but don't worry. If you don't know about jQuery, you can understand it without much effort. Learn the important concepts of jQuery on the go. This will be an awesome project to build because shopping websites are extremely popular today, more so because people have embraced digital shopping so much. Go through the project slowly and step-by-step. This is going to take time, but it is worth it!
10. Single Page Application

Here is another interesting project, where the page doesn't reload upon navigating through the side links, but the content will change. Again, we will be using eventListeners to change the view from one link to another.
Check out the code and explanation on this YouTube video.
Conclusion
We have discussed 10 out of the ocean of JS projects. However, these ten projects can add much value to your portfolio and cover almost all the important concepts you need to know about JavaScript. If you want to learn more about JS, do visit the list of JavaScript tutorials compiled by Hackr.io. Most of the time, you don't need any frameworks to write JS code and no editors or IDEs. You can write on a Textpad or Wordpad and save your file with a .html extension. JS files are stored with the .js extension, but you can include all the JS in the HTML file itself (though not advisable for a big project). Check our HTML projects to learn why HTML rules the web!
People are also reading:
- Javascript Certifications
- Javascript Books
- Javascript Interview Questions
- Javascript IDE
- Javascript Frameworks
- Javascript Libraries
- Javascript Cheat Sheet
- PHP vs Javascript
- Difference between Javascript vs Python
macdermottpubset48.blogspot.com
Source: https://hackr.io/blog/javascript-projects